HAMU - Rack Extensions
Rack Extensions for Propellerheads Reason
WELCOME TO THE HAMU WEB SITE OF
RACK EXTENSIONS FOR PROPELLERHEAD REASON
We love patch cables. The back plane of Reason is the place for creativity and magic. Our Rack Extensions is our humble contribution to empower all experimentalists with more flexibility and tools for the exploration of Sounds!
MidiTapper

MidiTapper lets you control buttons and knobs of your Reason devices by using any key on your MIDI Keyboard.
- You can press, tap or double tap each MIDI key.
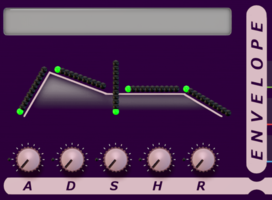
- Pulse outputs with full ADSHR envelop.
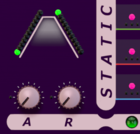
- Static toggle outputs with smoothing AR.
- Three separate sets of on/off output levels.
- Latest press velocity level S&H to separate output.
BASIC FUNCTION
A SIMPLE BUTTON
The MidiTapper is basically a button giving a control voltage output, which can be used for controlling many functions in your favorite Reason devices. Wherever there is a CV modulation socket for a parameter of device, MidiTapper can help you control that parameter. You can use it as a simple button, which at times is exactly what you need! Push the momentary button to increase distortion, lower volume, activate a harmonic etc. all at the same time. Release the button and all the settings return to where they were before.
USE YOUR MIDI KEYBOARD!
When you play, the closest control buttons to your fingers are the keys on you midi keyboard, and the keyboard usually automatically follows you when you change channel or track. With MidiTapper you can use any midi key you like, and I’m sure you can spare at least one from the 128 available, to control the simple button mentioned above.
In all honesty, this basic functionality can also be achieved by using features of a few Reason devices. Like Thor, as is elegantly shown by eXode in his ‘FX - Trigger Finger’ Combinator patch, in the free “The Reason Toolbox” refill.
But MidiTapper offers so much more, and with a more functional GUI.
ADDITIONAL FEATURES, A QUICK LIST
MidiTapper comes with loads of additional features, such as:
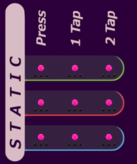
- Press, tap and double tap (similar to mouse double click), to trigger separate CV outputs.
- NEW Press will also sample and hold the Velocity leave on the Vel output.
- Two parallel CV output shapes:
- Envelope output (one shot pulse) with ADSHR
- Static output (on/off switch) with AR
- Three different output levels groups for ‘on’ and ‘off’ status, affecting all outputs above.
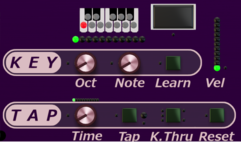
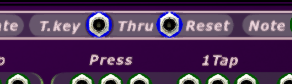
- A learn button for selecting activation key (‘Tap key’) from the midi keyboard.
- Sequencer CV input, in parallel with MIDI, to trig CV output shapes.
- Sequencer CV ‘Thru’ output, including - and ‘mingled’ with – the MIDI input.
- Option to include the Tap key or not in outgoing sequencer CV ('thru').
- NEW Reset to clear 'gate on' memory and momentarily stop all output to thru sockets.
- Color coded modulation input sockets for everything!
- Color coded cable indicators up front, showing which sockets are used.
- Plenty of meters and lamps for indication of signal status.

FROM BASIC IDEA TO FINAL FEATURES
Let‘s give you an overview of this device, in some kind of design improvement order, rather than GUI layout or signal flow.
A KEYBOARD CONTROLLED SWITCH
The original aim was to enable just this: Create a switch so that sound effects etc. can be controlled from the midi keyboard. Hence the name MidiTapper, and the first implemented function was to simply listen to midi notes and react to one specific trigging note – the “Tap key”; Tap key pressed turns the switch on, tap key released turns switch off; 0 and 1, easy as that. A simple way of specifying which key should trig the switch is to have one knob for the octave and another for the note within the octave.
All this is still available in the final design; the two key selection knobs are there, and a Tap out socket.

UTILITY OR INSTRUMENT?
Well, certainly a utility in our own opinion, since there is no sound output. Unfortunately this would force you to insert your MidiTapper into a Combinator and manually configure it to receive midi input. Better then to make it an instrument, so that it defaults to receiving midi.
“TAPPER”?
First extension idea was to control more than one switch from the same trigger key. The idea comes from the computer, where you’re used to three mouse button operations; Click & hold, click and double click. MidiTapper has the same, but on your keyboard you don’t ‘click’ – you ‘tap’! Right?
So the following was implemented; MidiTapper has three parallel switches activated by the same key, called ‘Press’, ‘1Tap’ and ‘2Tap’.
TAP TIMEOUT
We all have different speed in our fingers, and there is obviously a need to adjust the time limit for a ‘tap’ as opposed to a ‘press’ on and off.
There is also an important trade off here; When you want to trigger off a 2Tap (double click), you do not want to affect the Press and 1Tap switches. The status of the switches must be independent!

The solution is to wait with the decision until the input times out, just like with mouse clicks, which in turn leads to a delay for the trigging the Press switch. You can set the timeout to 0.00 so the Press switching is immediate, but then you will not at all be able to trig the 1Tap and 2Tap switches.
This timeout setting is controlled with the Tap Time knob.
OUTPUT LEVELS
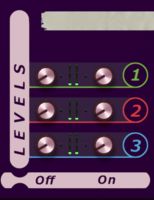
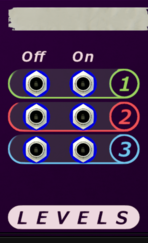
It would be great to have a knob up front to set the output CV level when the switch is on. So you can automate it, remote control it and don’t have to turn the rack around and find that socket trim knob on the receiving device. And there’s always a need for an inverted output from a CV generating device, but how many sockets of each polarity? CV Spider, for instance, has a chaining solution to this, but MidiTapper has a different solution; you choose both the levels! Having the switch ‘on’ or ‘off’ are simply two different states, and you separately choose what CV level should be output for each of them. There’s an ‘off level’ knob and an ‘on level’ knob. By simply setting the ‘off’ level to 1 and ‘on’ to 0 you have the inverted output.
We need both at the same time though, so there must be two sets of output levels, and while we’re at it, why not three? This will increase the flexibility to adjust different levels depending on how they will be used. We call these the three output Groups, and they have three out sockets each, and for each switch (Press, 1Tap and 2Tap), because you always need more sockets when you get creative!
Three groups, each with its own two levels (on and off), gives six knobs for the output levels. Done.
CROSSOVER SWITCHING TRANSITION
Hard switching on/off can be useful sometimes, but more often you want to have smooth transitions and a gradual change. These transition times should be controllable too!
Attack and release transition times for the outputs to go between the ‘off’ and ‘on’ levels were included, and are defined by two more knobs.

ONE SHOT OUTPUTS, ENVELOPE
Next feature entering the design playfield was the trig pulse output. A short pulse to be used for triggering activities would be useful to start sequencers, effect bursts etc. A beta tester expressed the idea to include an envelope shaper to this pulse, making it more useful on its own rather than relying on external CV units. So…
The ‘Envelope’ outputs were introduced, with knobs for attack and decay times, sustain level, hold and release times (ADSHR). Now the device size had to grow from 1 unit high to 2 units.
ADDITIONAL TAPPING SOURCES
While the basic idea was to use the midi inputs for trigging switches, this device now offers so much more. It would be nice to be able to trig it with other sources too, wouldn’t it?
A button on the panel must be included, so you can really click and double click with your mouse, for testing your setup if nothing else. And with a modulation socket for this button you have even more options!
This is a CV utility, so why can it not be controlled by sequencer note and gate CV? Included too!


NOTE AND GATE SEQUENCER CV OUTPUT
Now we have note and gate in, and we don’t want the MidiTapper to be a black hole, so the Thru output sockets are added.
Most of the time, you don’t want the trigger key to actually produce any note on instruments used. What to do?
Midi input going directly to other devices are out of reach for this device, since this is fed directly e.g. to midi receiving instruments. Possible solutions are all outside this device:
- Limit the midi receive range for the instrument, and keep the trigger keys to the one end of your single keyboard.
- Add a small midi keyboard for trigger keys only, and set it to an octave far below or above any keys you normally use.
LET THE TAP KEY PASS THRU
On the other hand, the sequencer outputs of MidiTapper are under our control; We can simply block the trigger key from being transferred to the Thru note and gate outputs! To maintain flexibility, a button is added so you can choose to block the trigger key or not.
ADDITIONS TO MIDITAPPER IN RELEASE 1.1.0

TAP KEY VELOCITY OUTPUT
From now, whenever you activate a Press event, the gate value of the Tap Key is sampled and held on the velocity output socket. 1Tap and 2Tap events will not affect this velocity level. This level can be quite useful as an additional control to whatever your pressing. With ModSweeper for instance, this can be used to control the Sweep Time!
RESET THE NOTE & GATE THRU OUTPUTS
Thru has on rare occations been observed to 'hang', in really complex trig combinations including change of tap key while tapping. Resetting this has been quite problematic, like removing the device and adding it again.
A means for the user to stop and reset the thru outputs is now provided with the Reset button and modulation socket. This can of cause also be use in ordinary circumstances, as a temporary 'silencer'.

DOWNLOADS & VIDEOS
~~~~~~~~~~~~~~~~~~~~~~~~
DOCUMENTS
MidiTapper Examples, PDF Document
MidiTapper Manual, PDF Document
This is the combinator which is created in the demo video, and which is also described in the PDF document of the same name, above.
This is a more complex setup including not only MidiTappers, but also several Meshers, Minglers and a ModStepper (FREE!).
Here's how to use it:
The midi keyboard is always set to play C0 at the low end.
Octave is controlled with C0 as tap key; Single tap will move up one octave, double tap will move down and press moves to middle (C4).
Harmonics are controlled with C#0; Single tap adds/removes a higher note, while double tap adds/removes a lower note. The level of the harmonics are controlled from the velocity of the same tap key C#0.
Above C#0 the keyboard is used for playing.
The tradeoff of this setup is that - due to the nature of sequencer CV - all played notes are sustained until all keys are released.
Please check out the video to see how it works!
DEMO VIDEO
MIDITAPPER FOR REASON - PRESENTATION AND TUTORIAL
This long video includes much of whats been stated on this page, plus a number of examples, finally building up to the Combinator patch available for download above. Please notice this is for you to understand this device, not necessarily pleasing your ears on the way. I'm not only a programmer, I'm also a happy but restricted musician. ;-)
VIDEO OF SETUP
Says Håkan:
What I've tried to accomplish is to have a basic home and light travel 'live' setup where I only use one midi keyboard.
The keyboard I use doesn't have a split, so my aim here was to create a setup where I can change octaves from the midi keyboard, with a tap key, while still keeping all tap keys in place independent of octave.
As an example of things I like to have available from tap keys, I also added harmonics with a Mesher, which can be turned on and off with a tap key.
The End